ADD A SPRING TOUCH TO YOUR HOME

Even if the weather isn’t cooperating quite yet – spring is on the way! Cheering up your home with some spring decor is the perfect way to prepare for warmer days and more sunshine. Here are some options to prepare your home for the next season!

ADD AN HERB GARDEN

While they may not last outdoors with the sporadic weather of spring, bringing potted herbs into your home and letting them soak up sunlight in a kitchen window is the perfect way to add life to your home and have access to fresh herbs while you’re cooking. 

THINK SPRING 

If you are all about DIY-ing, creating simple decorations can add a pop of seasonal color to your home. Take that pair of rain boots you don’t wear anymore and turn them into planters – add bright floral arrangements and use your new decor item as an inviting piece by your front door.

POPS OF COLOR

Neutral and sleek is all the rage right now, but adding a pop of color in your normal decor can add a cheerful touch to your home. Swap out your kitchen napkins or tablecloth with something a little bit more colorful, like soft blues or pinks. Small changes can do enough to make your home feel different without being overwhelming.

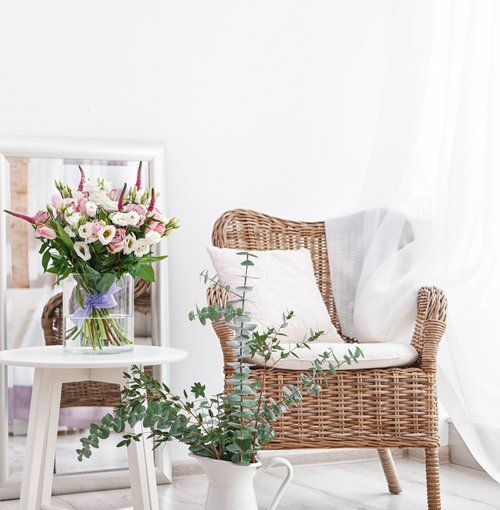
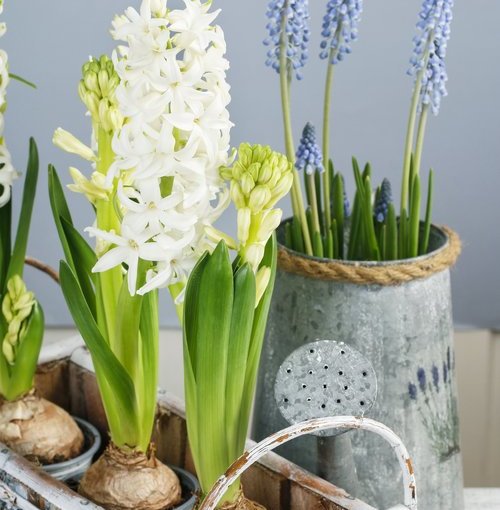
FLORALS ARE ALWAYS THE ANSWER

Whether or not you already include florals in your home decor, take the time to swap out or add something new that feels like spring. While fresh flowers are a great choice, consider picking up some faux florals for the majority of your decor and saving the fresh flowers for a centerpiece. Don’t be afraid to add pops of color, specifically yellows and pinks, to create a focal point for the room. 

TOUCH UP TIME

Is there a room in your home that is just feeling drab? Maybe it is dark and uninviting, or maybe it has white walls that have started to fade. While you are spring cleaning, consider adding a fresh coat of paint to a place in your home that needs a boost of light. Spring is all about being fresh and new, so your home should feel that way too!

Danesha Ritzberg
RitzbergRealty.com
(404) 793-0610

SPRING FORWARD INTO YOUR NEW HOME

This weekend, most of us will be turning our clocks an hour ahead as we ‘spring forward.’ We may be losing an hour of sleep, but that doesn’t mean you should lose hope on finding a home you love. If you’ve been thinking about buying a home but haven’t seen anything on the market that checks off the list of everything you’ve been looking for, this spring might just be when your dream home hits the market. At the end of every year, we see a major drop in the housing inventory. Homeowners are less likely to sell in the winter months, and most closings happen before it gets too cold. The good news for you is that this encourages sellers to put their homes on the market after the new year when both the weather and the market start to warm up again! 

Danesha Ritzberg
RitzbergRealty.com
(404) 793-0610

5 Must-Do’s Before Buying a House

If you’re ready to begin the journey of homeownership, it is important to cross a few items off of your to-do list before hunting for the perfect house. Buying a home is a process, and you want to be as prepared as possible. Here are a few steps to take that will get you ready to buy a home.

1. Get your money straight.

A year to six months before you begin the buying process, find a lender and have them pull your credit. This will give you insight into what you expect and what you may need to mend before you can make the purchase that you want to. Your lender will be able to let you know what you qualify for based on your income at the time so that you can look for homes within your price range when the time comes.

2. Decide where you are willing to stay a while.

A home is a commitment. You can always resell, but with the transaction fees that come along with buying a home, you may end up losing equity if you try to sell your home quickly after buying it. If you don’t think the home is somewhere you can see yourself for several years, keep looking.

3. Don’t hesitate to take your time.

There is a lot more to the purchasing process than just buying a home. It is important to weigh the pros and cons of a home that you are considering buying. How is the neighborhood? Will the long commute be overwhelming in 6 months? Make sure you’ve considered the aspects of what makes up your day-to-day life and how your new home will help or hurt that process.

4. Know the difference between your dream home and a fantasy home.

Being realistic is a key part of making the home buying process easier on you. Your agent will work hard to make your deal the best it can be, but when it comes down to it, you will usually get what you pay for. Major discounts typically mean you will have work to do, and that doesn’t necessarily mean a steal for you. Be realistic during your search and keep in mind that the perfect home might not be out there, but that doesn’t mean that your dream home isn’t.

5. Find an agent for you.

Finding an agent that works for you take a major weight off of your shoulders in the home buying process. Ask your friends and family, and look into local agents that come highly recommended. When you find a trusted agent, they will be able to show you houses that you can’t find from a simple internet search and be able to negotiate for you along the way. It is their specialty – don’t waste the time or energy trying to do the job of a realtor on top of everything else you have on your plate!

Danesha Ritzberg
RitzbergRealty.com
(404) 793-0610

AVOID THESE MISTAKES THAT DELAY LENDER APPROVALS

If you’re getting ready to buy a home, you’re likely realizing that one of the most important parts of the process is getting approved for a mortgage that works for you. To get the best rate and avoid losing your deposit, steer clear of these common mistakes.

Leaving out details from your financial profile.

The best way to avoid doing this is having a great mortgage lender. Making sure you include not only your basic information, employment and living history, income, assets and debts, but also ensuring you answer every single question. Leaving details out of your profile can throw off the entire process, so having someone who is meticulous enough to make sure all your information is made available is key.

Assuming pre-approval is equal to actual approval.

Pre-approval for a mortgage means that you’ve talked to a potential lender or maybe even provided some documentation that gave the impression that you will be approved for a certain amount. Don’t be confused – this is not an actual approval. You need to make sure your loan is approved by an underwriter before making any offers to buy a home. When you are “underwriting approved” you will be able to get a formal loan commitment. Without this document, there is no proof of actual approval, meaning that your profile has been evaluated but nothing official to show approval.

Failing to provide every single piece of documentation needed.

Your lender is going to want very detailed documentation of your financial profile, including the following:

  • Pay stubs covering 30 days
  • 2 of tax returns & W-2s
  • YTD business financial statements (if you’re self-employed)
  • 2 months of statements for all your asset accounts
  • Explanations and paper trails of all deposits withdrawals over $1,000
  • A home insurance quote with adequate coverage
  • Full financial information on any other homes/businesses you own

You will need to provide all these documents, and if you have a commissioned or variable income, you will need to give permissions to your lender to verify that income. Your credit will be run, which can expose any information you didn’t disclose. 

Not knowing enough about mortgage rates.

Once a seller accepts your offer, you will be in contract on that home and you will be ready to lock in your mortgage rate. You cannot lock your rate until you’re in contract, which means that any rate market movement can impact you until then. Rates change throughout each day, and they are priced based on how long they are locked. A shorter lock, about a month or less, will have a lower rate than a lock of 60+ days. If you want to avoid any surprises, talk to your lender and ask them to use your closing timeline to quote rate locks.

Danesha Ritzberg
RitzbergRealty.com
(404) 793-0610

3 Neat Uses for Peel & Stick Tiles

Whether you are renting and unable to make permanent changes to your house, or you own and a full remodel just isn’t in the budget right now, peel & stick tiles are an affordable, versatile way to make a room feel updated and new. These tiles only require a cutting mat, a ruler, and an X-Acto knife and are easy to remove without causing any damage. Many of the peel & stick tile company have easy-to-follow instructional videos which show you how to measure, cut, peel, and stick your new tile. Here are 3 ways you can incorporate this temporary tile into your home!

1. Upgrade your backsplash.

Whether it is your kitchen or bathroom, old backsplash can prevent you from fulfilling your styling vision. It can also be a real eyesore depending on how old it is.  These peel & stick tiles can give those rooms a complete makeover with ease. Just cut the tile to fit around your outlets and press to stick!

2. Customize your furniture.

If you have been thinking about replacing your plain furniture, consider this first. Adding the tiles to fill in cabinet panels or topping a coffee table can add a chic, expensive feel to your furniture. Think small too; you can add tiles around a cheap picture frame to make it look like it is from a boutique!

3. Make your fireplace pop.

Older fireplaces are often surrounded by plain walls or outdated tiles. Make your fireplace the focal point for all the right reasons by sticking the tiles on painted or previously tiled surfaces, making sure to avoid any areas that would come in contact with the actual fire.

Danesha Ritzberg
RitzbergRealty.com
(404) 793-0610

Fall Maintenance Check List

Halloween is quickly approaching and depending on where you live, there is a good chance fall weather is coming right along with it. Before the season is in full swing, get a head start on your seasonal maintenance. By preparing for fall weather, you can address any issues that may get worse with colder temperatures or just keep your home in the best condition to make sure your property is in top shape no matter the season. Here is a great reference checklist to make sure you’re doing the basics to get your home ready for fall!

1. Rake it up.

Everyone loves the changing leaves, except your grass. Leaving fallen leaves in your yard can kill you grass and prevent growth in the spring. Make sure you keep those leaves raked up!

2. Check your gutters.

Those same leaves that can kill your grass can also clog your gutters. Clogged gutters can lead to plenty of other issues, so be sure to periodically check your gutters to prevent buildup.

3. Don’t forget your roof.

You don’t want fall to pass and winter to arrive only to find out you’re missing a few shingles. While you’re checking your gutters, make sure to check on your roof too.

4. Store summer decor.

If you are set to get cold temperatures this fall, take the time to pack away your summer items. If your patio furniture isn’t equipped for a surprise snow storm, you’ll be glad you took the time to store it away now.

5. Prevent frozen pipes.

No one wants frozen, bursting pipes. Remember to shut off water to your exterior faucets before the weather hits freezing temperatures.

6. Venting is healthy.

As the temperatures drop, static electricity increases.  If you have lint build up in your dryer, this static electricity makes it easier to ignite.

7. Do your own inspection.

Take a walk around the interior and exterior of your home and try to look at it with fresh eyes. Keep an eye out for any damage to walls, floors, or cement outdoors. Be sure to fill any cracks or fix loose gravel that could cause a fall when colder weather is added to the mix.

8. Check your insurance.

Is your home insurance up to date? Make sure your insurance will stand up in a storm and that you will be covered no matter what fall will bring.

Danesha Ritzberg
RitzbergRealty.com
(404) 793-0610

HOW TO SEAL YOUR GRANITE COUNTERTOPS

Natural stone countertops are one of the most popular fixtures in a kitchen today. With granite being the most popular, it is often found in homes that sell quickly. If your countertop is granite and you want to keep it sell-ready for years, you’ll need to find a way to take care of it. One of the best ways to do so is to seal your countertops. Because granite is porous, liquids can easily seep into the stone. To stop this, you’ll need to seal your granite. Thankfully, this process is easy and quick.

You will only need to seal your countertops once a year, but it is good to check and see how your seal is holding up every few months. You can do so by pouring a small amount of water on your countertop and leaving it for 30 minutes. If it beads up, your sealant is great. If not and it soaks into the stone, it is time for another round of sealing.

To seal your counter, you’ll need granite cleaner, granite sealer, and lint-free rags.

First, you will need to clear off your countertops. The process will be easiest if all items are removed. Then you’ll need to use the granite cleaner to completely scrub off any residue, crumbs, or spills. Once they are clean, use a new cloth to dry them off and let them sit until morning, assuring that the countertop is completely dry.

Next, you will want to open your windows. The sealant can be potent, so having a breeze will help keep the strong smell at bay. It is recommended to do a spot test before you begin sealing your entire counter to make sure that the sealer doesn’t cause any damage your stone type. As you begin sealing, you should work in small sections of 2-3 square feet. You will spray the sealer and then wipe it into the surface of your countertop quickly. Work throughout your kitchen and make sure you are wiping the sealer before it dries.

Lastly, you will need to take another lint-free rag and buff your counters. Once you’ve buffed every inch, you will need to let the counters cure for 24 hours – but then they will be sealed and ready to use again!

Danesha Ritzberg
RitzbergRealty.com
(404) 793-0610

Want to Hide Your Litter Box? Create A Kitty Corner!

What You’ll Need:

Side table
Twisted jute rope
Short tension rod
Two window valances

1. Using the jute rope, create a scratching post by wrapping the rope around the legs of your side table. This will protect the legs and offer entertainment to your furry friends.

2. Measure the height and width of your table and cut your window valances to match the size. Once you’ve done that, you can put the valences on a tension rod and place the rod between the legs.

3. Place your litter box under the table behind the valences, and show your feline family member where his or her litter box has been moved to!

Now your cat(s) can go about their business without your visitors watching.

Danesha Ritzberg
RitzbergRealty.com
(404) 793-0610

REFRESH YOUR TILE GROUT

Bathroom tile grout can become quite the headache. Being a high traffic area, it can feel impossible to keep sparkling clean in these areas, especially in mold-prone spots near toilets and tubs. If your grout is looking less-than-fabulous, you can try this quick trick and save yourself a renovation.

The Items You Need:
Vinegar + water solution (or your preferred floor cleaner)
Scrub brush
Paper towels
Small craft paintbrush
Grout renewer product (sold in hardware or home improvement stores)

STEPS

1. Using the vinegar and water solution, clean your floors with your scrub brush. Be as thorough as possible. Once the floors are as clean as you can get them, give them time to dry. The grout renewer works best on clean, dry floors.

2. Using your paintbrush, brush the renewer onto the grout. Avoid getting any of the renewer on the tile, and be sure to wipe it off if you have any accidents. Work from the back of the room to the doorway so you don’t have to worry about smudging any of the renewer when you head back out of the room.

3. Once all the grout lines have been painted, avoid walking on the tile for 24 hours and let it fully dry for 72 hours. Now your bathroom tile should look fresh and clean! A quick fix all for under $20.

Danesha Ritzberg
RitzbergRealty.com
(404) 793-0610

The Seller Rejected Your Offer – What Now?

Finding the right home is a serious process. Just like any other long term commitment, you’ve likely spent a great deal of time finding a home that you love and can picture yourself spending your life in. So what happens when you think you’ve found the right one but the seller rejects your offer? Here are 3 ways to deal with losing out on the home you had your heart set on.

1. Don’t obsess over the seller.

It is natural to want to know why your offer was rejected and you may want to start to ask questions about the seller’s motives. You could spend all your time doing that research, instead of continuing your search for a home. It may be difficult, but moving on is your best option. You will never know how a stranger is thinking, so rather than heartbreak, keep searching. They may want to come back to the table, but just in case they don’t, it is better for you if you are still trying to find a dream home.

2. If you haven’t put out your best offer yet, now is the time.

Maybe you wanted some room for negotiations, so your offer was lower than what you’re willing to pay for the home. This is the time to consider if this house really is ‘the one.’ If you feel that you are willing to exchange that wiggle room for your dream home, it is time to make that your best offer.

3. Move on when it is time.

If you’ve made your best offer and your seller just isn’t ready, it is time to move on. It can be easy to get hung up on a house that felt like it could be your next home, but you will be thankful that you focused on moving on. Even if it takes time, you will be thankful that you moved on and kept looking when you find yourself in your true dream home.

Just like any other long term commitment, searching for the right home is worth the wait.

Danesha Ritzberg
RitzbergRealty.com
(404) 793-0610